Shattered Glass Nail Art

Have you seen the latest nail art trend? Shattered glass nails are all over Instagram and the blogosphere right now and for once I'm right on key.
The first time I saw looks done with iridescent materials was on Instagram account SFNoMA this spring (using hoolahoop tape). Since then I've seen more and more manicures using various materials to create extra reflective nails. I'm using an iridescent film from Born Pretty Store in my manicure which was sent to me for review. It is advertised as a nail foil but in fact it is a thin film that you cut to desired shapes and then stick to your nails using wet topcoat or similar. Since it is advertised as nail foil of course I thought it was but after some trial and error I realised that it just isn't.
A big advantage of it not being a nail foil is that regular topcoat won't dull its effect. And the effect is spectacular. These nails are the coolest I've worn in a long time! Sadly pictures don't really do the effect justice because it really looks like glass or mirror pieces on my nails. They are so sparkly when hit by even the smallest ray of light.
A disadvantage of it not being nail foil is that it requires a few coats of topcoat to be nice and flat, I have three coats in the pictures and some bubbles to show for it. Try to not add pieces too close to the cuticle or tip of the nail to prevent this, and also where the nail is curviest. I found that pieces that were very close to the cuticle or nail tip more easily stuck out after applying top coat.
This non-foil product is listed as item number 22313 (I have option 4) at Born Pretty Store and retail for roughly 3.60 $. For that price you get a 50 cm long piece of iridescent film. I used about 1.5 cm to do all ten nails so I'm set for a while. I will just tell you to click and buy right now because you will wanna see this nail style for yourself. Go buy!

My 10 % off code, MGL91 gets you 10 % off any item not already on sale. (Please note that I don't make any profit or similar from this code being used. As far as I know it's only a way for the BPS representatives to see if my readers buy stuff from them or not, i.e. if they should continue to send me stuff for review.)


PÃ¥ svenska:
Har du sett den senaste nail art trenden? Naglar dekorerade som krossat glas är överallt på Instagram och även bland bloggarna. För en gång skull är jag helt rätt i tiden med min manikyr.

Första gÃ¥ngen jag sÃ¥g iridiserande naglar var hos SFNoMA i vÃ¥ras (hon använder rockringstejp till sina naglar). Sen dess har jag sett dem lite här och där och med olika material för att fÃ¥ till den där reflekterande ytan. Jag använder en iridiserande film frÃ¥n Born Pretty Store i min manikyr, jag har fÃ¥tt den skickad till mig för att recensera/testa. Det stÃ¥r pÃ¥ hemsidan att det är nagelfolie men det är det inte alls. Det är en tunn plastfilm som man fÃ¥r klippa till och sen fästa pÃ¥ naglarna i blött överlack eller liknande. DÃ¥ det stÃ¥r att det är nagelfolie utgick jag ju frÃ¥n det men efter att ha slitet mitt hÃ¥r och testat insÃ¥g jag att det inte är det.

En stor fördel med att det inte är folie är att effekten inte förtas av överlack. Och effekten är verkligen spektakulär. Dessa är de coolaste naglar jag har haft på mycket länge. Tyvärr är det en effekt som är svår att fånga på bild men det ser verkligen ut som små bitar av glas eller spegel som ligger på naglarna. De är så himla glittriga så fort de träffas av ljus.

En nackdel med att det inte är nagelfolie är däremot att det krävs ett par lager överlack för att få det riktigt slätt och fint. Jag har tre lager på bilderna och då bildas lätt bubblor som synes. Försök att inte lägga bitarna för nära nagelbandet eller toppen på nageln, de bitarna sticker lättare upp fick jag känslan av.

Den här icke-folien finns som vara 22313 (jag har den fjärde varianten) hos Born Pretty Store och kostar ungefär 3.60$. För det priset fÃ¥r du en 50 cm lÃ¥ng bit av iridiserande film. Jag använde ungefär 1.5 cm film för att fixa alla tio naglar sÃ¥ det räcker länge. Jag tänker helt enkelt be dig att genast klicka dig in hos BPS och köpa detta. Det är sÃ¥ fint att du bara mÃ¥ste se det själv. Köp!

Min rabattkod MGL91 hos Born Pretty Store ger 10 % i rabatt pÃ¥ varje vara som inte redan är nedsatt/read. (Notera att jag inte fÃ¥r betalt eller sÃ¥ om nÃ¥gon använder den koden, utan vad jag vet är det mest för att BPS representanter ska kunna se om mina läsare handlar hos dem eller inte, dvs om det lönar sig att skicka grejor till mig.)

Marimekko Unikko Nail Art

Two weeks ago I did a 40 hour cruise to Helsinki with some co-workers. We had a lovely time both on board and in sunny Helsinki. I went all in wearing nothing but Finnish design and of course did Marimekko inspired nails.
The Unikko print is one of Marimekko's most well-known and is simplistic enough to translate into doable nail art for both hands. I used Nail Lacquer Love's Marimekko nails as my inspiration but picked colours that would work better with my dresses.

I loved wearing this manicure but was a little disappointed that the sales clerk at the Marimekko store I visited didn't notice/comment on it ^-^.

Apologies for the colours looking completely different in these pictures! My camera does not like orange.

The ring in below photo is an old silver ring (60's I believe) by a Finnish designer, told you I went all in ^-^.

Polishes used: OPI My Boyfriend Scales Walls, OPI Tasmanian Devil Made Me Do It, Sephora by OPI Paisley Attention to Me, China Glaze Papaya Punch and Sweet Color striper in black.


PÃ¥ svenska:
För två veckor sen åkte jag på finlandskryssning med några kollegor. Det var faktiskt riktigt härligt och vi hade de fantastiskt trevligt både ombord och i ett soligt Helsingfors. Jag gick all in stilmässigt och bar bara finsk-designade kläder (inkl pyjamas och den ring som syns på sista bilden :P) och var förstås tvungen att ha Marimekko naglar också.

Unikkomönstret känner nog de flesta igen och är sÃ¥ där lagom komplicerat, jag lyckades fÃ¥ till hyffsade versioner pÃ¥ bÃ¥da mina händer vilket alltid är kul. Jag använde Nail Lacquer Loves Marimekkonaglar som min inspiration men valde färger som passade bättre till de klänningar jag packat med mig.

Jag älskade att bära den här manikyren men var lite besviken på att kassörskan i den Marimekkoaffär jag besökte inte märkte något/kommenterade det ^-^.

Striping tape holder review

Today I have a review of a new to me nail art tool, a striping tape holder.
Striping tape is great for creating those crisp lines that I struggle with painting freehand. It can be used for a variety of style but I know I'm not the only one who is reluctant to use it. A striping tape roll can be a pain to work with, especially when you've lost track of where it starts. Sometimes I feel like it's seriously impossible to find it! Additionally you need to keep scissors at hand to cut the tape into smaller pieces and keep all those small pieces under control.

I was hoping that the striping tape holder from Born Pretty Store (item 20485) would solve these issues. It did take care of my first issue since it ensures that the start of the tape is always at hand/doesn't mysteriously disappear into the roll. It also rolls nicely within the holder when I tug at the tape. However it does not help me cut the tape. For some reason I thought I would be able to use this as a tape dispenser that would conveniently cut off the tape for me but the plastic tip can't do this. I guess I shouldn't have expected this, especially considering the holders design. If it cut the tape, it would be more or less impossible to reach the next bit of tape since it would be inside the holder.

To summarize, if you want something to keep your striping tape nicely tucked in and facilitate always being able to find where the tape starts this is the right purchase for you. Since it is currently on sale for 1.45 $ it's quite a bargain (but it does not come with striping tape). If you however are looking for something that will cut the tape for you, this won't do the job.

Below is how the tape looked after I tried to cut it on the edge of the holder. As you can see the only thing that happened was that the tape got distorted and crooked.
If you feel like checking out the Born Pretty Store you can use my 10 % off code, MGL91 to get 10 % off any item not already on sale.


PÃ¥ svenska:
Idag har jag ett nytt nail art hjälpmedel att dela med mig av, en hållare för striping tape. Striping tape är ju jättebra, särskilt för att få till de där riktigt krispiga linjerna. Men det har ju också ett par nackdelar som gör att flera med mig inte använder det så ofta. En av dem är att hålla reda på var tejpen börjar på rullen. Om du lyckats tappa bort änden kan det ibland kännas helt omöjligt att hitta den igen. Dessutom kräver tejpen en sax för att klippa till bitar som man sen måste hålla reda på.

Jag hade hoppats att denna hÃ¥llare frÃ¥n Born Pretty Store (objekt 20485) skulle Ã¥tgärda bÃ¥da dessa problem. Den löser problemet med att jag tappar bort var tejpen börjar dÃ¥ änden löper genom hÃ¥llarens öppning. Den rullar ocksÃ¥ fint i hÃ¥llaren när jag drar i tejpen. Men den klarar inte av att klippa av tejpen. Av nÃ¥gon anledning trodde jag att detta skulle vara som en liten tejphÃ¥llare som ocksÃ¥ kan skära av tejpen. Det klarar inte plasttippen pÃ¥ denna hÃ¥llare av. Jag borde kanske inte ha förväntat mig att den skulle kunna göra detta utifrÃ¥n hur den ser ut men det hade jag. När jag tittar pÃ¥ hÃ¥llaren sÃ¥ inser jag att om den nu skar av tejpen sÃ¥ skulle jag ju aldrig komma Ã¥t nästa tejpbit inne i hÃ¥llaren.

För att summera, om du vill ha något som håller din tejp och ser till att du alltid vet vart den börjar är detta absolut ett bra köp. Särskilt som den just nu kostar 1.45 $ (säljs dock utan striping tape!). Om du däremot vill ha en hållare som också kan skära tejpen är detta inte rätt produkt för dig.

Om du känner för att shoppa lite själv hos Born Pretty Store kan du använda min 10 % rabattkod. MGL91 ger 10 % i rabatt på varje vara som inte redan är nedsatt/read.

Crazy funky french nails

So last but certainly not least this month, my craziest set of funky french nails ^-^.
I drew my initial inspiration from a chic manicure done by Flickanail but where her colours were spot on mine might leave a little something to be desired. I already knew that OPI Samoan Sand is a little too yellow for me but I still had to use it (five coats!). Then I paired it with a minty delight that ended up a little lacking in opacity. The result was quite intriguing but far from pretty.

I added the black line to try and salvage the situation and it did improve it somewhat but still leaves me un-impressed. My lesson? Sometimes simply "copying" the original is better than trying to put your own touch on it!
In this picture you can see my dedication to this look. My nails had grown particularly long so I decided to file them round to really play with the shapes.


Polishes used: OPI Samoan Sand and Essie Turquoise and Caicos (+ black liner not pictured)

PÃ¥ svenska:
Sist men verkligen inte minst är mina galnaste "funky french". Jag inspirerades initialt av en chic manikyr av Flickanail men där hennes färger blev perfekta ihop sÃ¥ lämnar mina lite i övrigt att önska. Jag visste ju egentligen redan att OPIs Samoan Sand är för gul för mig men jag ville liksom ändÃ¥ använda den (fem lager!). Sen valde jag en mintig skönhet att kombinera den men, men det lacket var mindre opakt än önskvärt. Resultatet var spännande kan man kanske säga, men snyggt är fel ord.

Det var därför jag adderade de svarta linjerna, för att försöka rädda manikyren. Det blev faktiskt lite bättre tycker jag men som helhet är det ju inte särskilt snyggt va? Min läxa? Ibland är det bäst att helt enkelt "kopiera" manikyren rakt av istället för att försöka sätta din egen prägel på det...

Om man tittar noga ser man också att jag experimenterat lite med min nagelform. Då de var rätt långa så filade jag dem runda för att spela extra på formerna i manikyren.


United in Pink Nail Art with Petla Wishes 2

As you all know, October is Breast cancer awareness month.
For the third year in a row Helena at Lacky Corner has been hosting a pink week called United in Pink to raise awareness. Previous years I've been able to participate more but this year it looks like I'll only get one manicure done. Helena has also written interesting things about this cause all week so do check out her blog for more information.

As for me, I will primarily say that I find breast cancer awareness particularly important because you can actually take measures to check yourself for changes. This means that this month is not only about donating money but also serves to remind yourself and other women the importance of doing regular self examinations as well as not overlooking invites for breast screening. 


I couldn't decide if I liked this manicure better shiny or matte. Below is a shiny picture. 

Polishes used: Cirque Fleur est Belle and KIKO 374


PÃ¥ svenska: Som ni alla vet är ju oktober mÃ¥naden för att uppmärksamma bröstcancer. För tredje Ã¥ret i rad kör Helena pÃ¥ Lacky Corner en rosa vecka kallad United in Pink. Tidigare Ã¥r har jag varit med mer men i Ã¥r har jag tyvärr haft svÃ¥rt att hinna med sÃ¥ det blir nog bara ett inlägg för mig. Helena har ocksÃ¥ skrivit bra och intressanta inlägg kring sina rosa manikyrer sÃ¥ kolla gärna in hos henne för mer information.

Själv säger jag nog bara att jag tycker att just bröstcancer är särskilt viktigt att uppmärksamma då du själv bör ha en aktiv roll i att hålla koll på dina bröst. Det ger att den här månaden inte bara handlar om att samla in pengar till forskningen utan också att påminna dig och andra kvinnor om att både kontrollera dina bröst själv samt gå på mammografi om du blir kallad.

40 Great Nail Art Ideas - Orange, Purple and Green

Time for another post for the 40 Great Nail Art Ideas initiative!
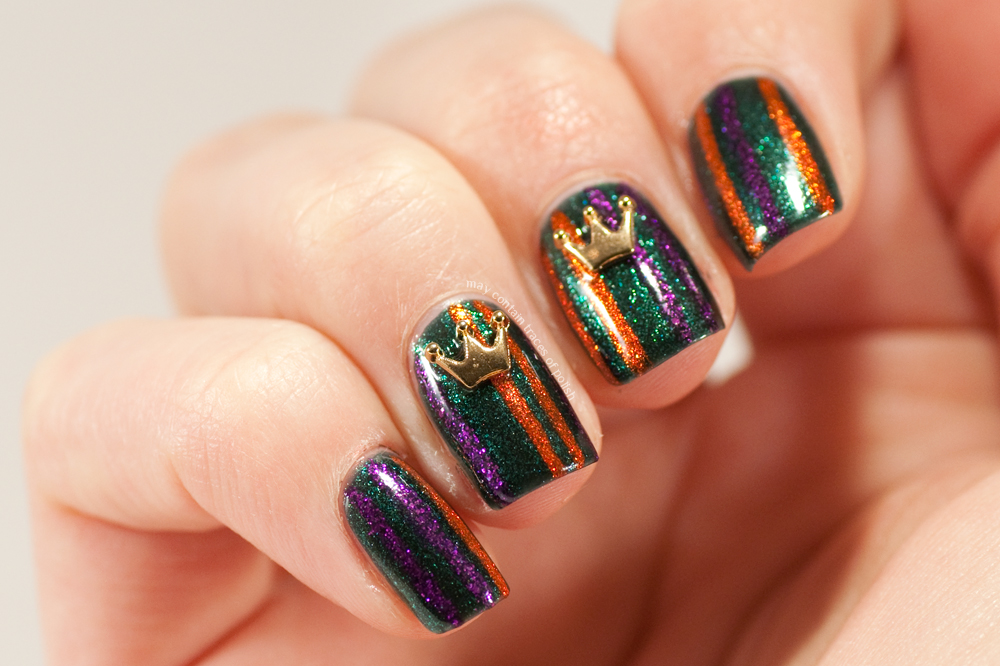
This weeks colour prompt is orange, green and purple which is quite a specific combination that I assume specifically flirts with Halloween. Despite loving colours this prompt threw me off a bit since it's quite an unconventional combination. Additionally with my technique being embellishments or 3D I was not looking forward to coming up with a manicure that filled these criteria!

My approach to creating this manicure was to dig through Helmer trying to find polishes that might work together without being too harsh a contrast to each other. When I found Cliché Poema it finally fell in place, as you can see I went for a combination of jewel toned shimmers and I love how they compliment each other. The studs was another lucky find from my small stash of nail decorations. I believe they are from Born Pretty Store.

My guess is that we will see plenty of Halloween inspired looks today. Check out inLinkz below for some inspiration!


Polishes used: Cliché Poema, China Glaze Riveting, Orly Bubbly Bombshell and Essence Alice Had a Vision Again (the two purples where mixed).


PÃ¥ svenska:
Dags för en till manikyr i initiativet 40 Great Nail Art Ideas. Denna veckas färgprompt är orange, grönt och lila vilket känns väldigt specifikt och gissningsvis är en tydlig flört med Halloween. Trots att jag älskar färg så var det initialt inte någon höjdarkombination för mig. Dessutom fick jag 3D eller dekorationer som extratema så jag har i veckan fasat för vad jag kan åstadkomma på temat...

Min utgångspunkt blev i alla fall att gräva i Helmer på jakt efter lack som kan fungera ihop utan att bli för grälla i kontrast till varandra. När jag hittade Cliché Poema så föll bitarna äntligen på plats, som du kan se så blev det en juveltonad kombination av skimmerlack. Tycker de kompletterar varandra så väl! 3D-dekorationerna var ett till fynd i Helmer från min låda med dekorationer. Jag tror de kommer från Born Pretty Store.

Gissar att vi får se mycket Halloween-inspirerat i inLinkz nedan så spana gärna in om du behöver tips på lackningar att testa!