Today we're heading for a Christmas market followed by an overnight stay a few hours north of Stockholm.
I'm taking tomorrow off from work and I'm already now loving it! It always feels very luxurious to take extra days off outside the regular summer and Christmas vacations. I should really plan for more of these in spring.
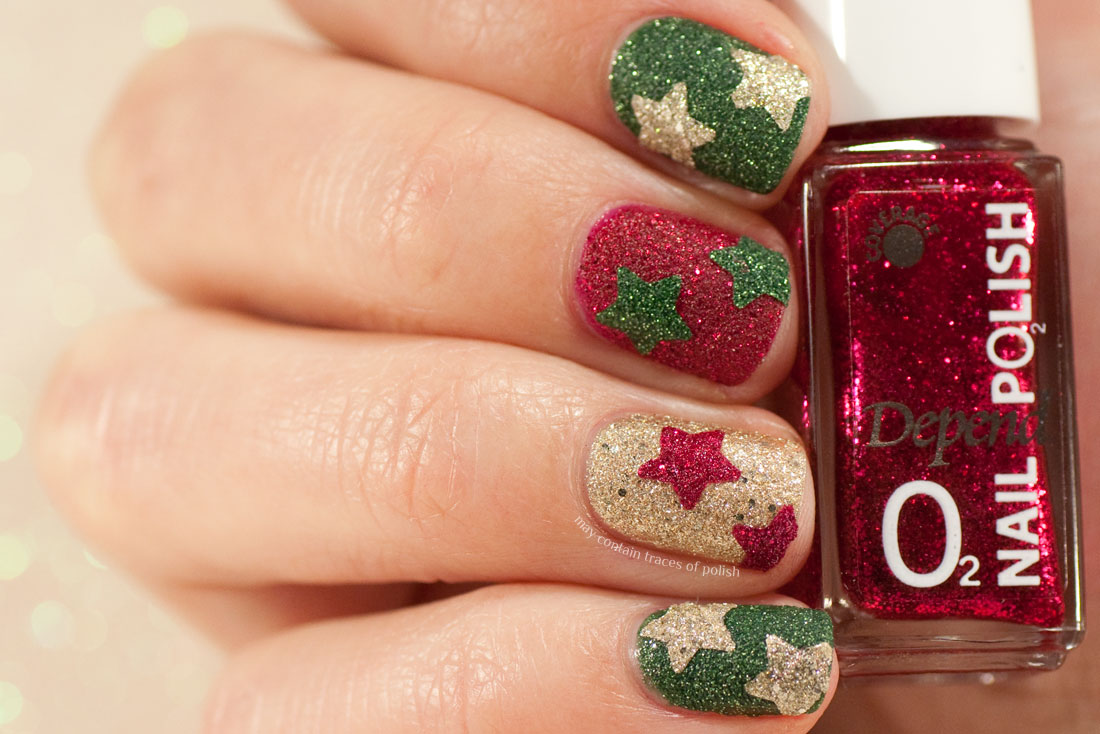
I asked S for polish advice the other day and he happily picked the colours green, red and gold. Can't be more Christmasy than that! I wore the polishes without decoration for a day before realizing they would look totally cool with stars on top.
I have a star punch, so I painted each polish on my silicone mat and then peeled them off and punched out stars that I attached to the nearly dry polish on each nail.
Polishes used: Depend 5031, Depend 5034 and P2 Precious
PÃ¥ svenska:
Idag ska vi iväg på julmarknad följt av övernattning på ett ställe ett par timmar norr om Stockholm. Tog ledigt från jobbet på måndag och det valet är jag redan på förhand himla nöjd med. Känns väldigt lyxigt att vara ledig utöver sommar och julperioden, borde planera in fler strödagar med ledighet till våren!
Bad S om lackråd häromdagen och han valde glatt färgerna grönt, rött och guld. Kan inte bli annat än jultema då! Jag bar de tre lacken utan extra dekoration en dag innan jag kom på att de skulle se jättebra ut med lite stjärnor. Stjärnorna är stansade, jag har målat respektive färg på min silikonmatta och sen när det torkat stansat ut stjärnor som jag fäst i ett lager nästan torrt lack på nageln.
Showing posts with label texture. Show all posts
Textured nail art
Sunday, 4 January 2015
Today's Nail Art Sunday has the theme New Year and I do hope everyone has had a pleasant end of 2014 and start of 2015.
My year has started with lots of aching muscles due to the skiing holiday. Skiing is weird in that it both can feel amazing coming down a piste and so bad due to aching limbs at the same time. As for my nails, they are not celebrating the new year as much as looking back at the past two years and one of the main polish trends. Textured polishes!
Zoya recently announced that they are retiring their PixieDust line and that feels like the end of an era to me. I never owned any PixieDusts but have textured polishes from some other brands and really like them. My favourites cover with just 1-2 coats, are full of sparkles and quickly dry both textured and matte. Even if I don't feel like I need every colour textured I do very much enjoy the ones I have. Hopefully we will continue to see some textured looks even in 2015! And hopefully we will also have a year full of new and interesting polishes. I don't need as many collections as I've seen in 2014 but hope for some truly new and interesting shades and styles!
Initially this look was meant to look like a knitted sweater but I don't think my work with the dotting tool ended up tidy enough for that to come true. I still think it kind of works though.
Polishes used: Isadora Purple Crush, Isadora Sky Crush and KIKO 621
PÃ¥ svenska:
Dagens Nail Art Sunday har temat nytt år och jag hoppas alla haft ett skönt avslut på 2014 och en bra början på 2015.
Mitt år har börjat med massor av muskelvärk på grund av skidåkning. Att åka skidor är lite konstigt, det kan samtidigt vara fantastiskt att swischa ner för pisten och hemskt för allting gör ont. Vidare till naglarna har jag idag valt att inte titta framåt så mycket som bakåt till en av de stora trenderna de senaste två åren. Lack med sandig yta!
Zoya meddelade nyligen att de ska sluta sälja sin PixieDust serie och det känns lite som spiken i kistan på sand-trenden. Jag har iofs inte själv några PixieDust-lack men flera andra märkens sandlack och gillar de verkligen. Mina favoriter täcker på bara 1-2 lager, är fulla av glitter och torkar snabbt till en både sandig och matt yta. Även om jag inte känner att jag vill ha varje nyans i sandlacksvariant så gillar jag verkligen de lack jag har med effekten. Jag hoppas att vi kommer att kunna fortsätta använda dem framöver utan att det känns hopplöst ute. Jag hoppas också att vi får ett år fullt av nya spännande lack. Jag behöver inte lika många kollektioner som jag sett det senaste året men väl lite verkligen intresseväckande lack och stilar.
Från början var min tanke att skapa ett mönster som påminner om en stickad tröja med sandlacken. Sen blev det inte riktigt så då min förmåga att skapa raka "pluppar" med dottingtool inte funkade så bra men manikyren är väl ändå helt okay tycker jag!
My year has started with lots of aching muscles due to the skiing holiday. Skiing is weird in that it both can feel amazing coming down a piste and so bad due to aching limbs at the same time. As for my nails, they are not celebrating the new year as much as looking back at the past two years and one of the main polish trends. Textured polishes!
Zoya recently announced that they are retiring their PixieDust line and that feels like the end of an era to me. I never owned any PixieDusts but have textured polishes from some other brands and really like them. My favourites cover with just 1-2 coats, are full of sparkles and quickly dry both textured and matte. Even if I don't feel like I need every colour textured I do very much enjoy the ones I have. Hopefully we will continue to see some textured looks even in 2015! And hopefully we will also have a year full of new and interesting polishes. I don't need as many collections as I've seen in 2014 but hope for some truly new and interesting shades and styles!
Initially this look was meant to look like a knitted sweater but I don't think my work with the dotting tool ended up tidy enough for that to come true. I still think it kind of works though.
Polishes used: Isadora Purple Crush, Isadora Sky Crush and KIKO 621
PÃ¥ svenska:
Dagens Nail Art Sunday har temat nytt år och jag hoppas alla haft ett skönt avslut på 2014 och en bra början på 2015.
Mitt år har börjat med massor av muskelvärk på grund av skidåkning. Att åka skidor är lite konstigt, det kan samtidigt vara fantastiskt att swischa ner för pisten och hemskt för allting gör ont. Vidare till naglarna har jag idag valt att inte titta framåt så mycket som bakåt till en av de stora trenderna de senaste två åren. Lack med sandig yta!
Zoya meddelade nyligen att de ska sluta sälja sin PixieDust serie och det känns lite som spiken i kistan på sand-trenden. Jag har iofs inte själv några PixieDust-lack men flera andra märkens sandlack och gillar de verkligen. Mina favoriter täcker på bara 1-2 lager, är fulla av glitter och torkar snabbt till en både sandig och matt yta. Även om jag inte känner att jag vill ha varje nyans i sandlacksvariant så gillar jag verkligen de lack jag har med effekten. Jag hoppas att vi kommer att kunna fortsätta använda dem framöver utan att det känns hopplöst ute. Jag hoppas också att vi får ett år fullt av nya spännande lack. Jag behöver inte lika många kollektioner som jag sett det senaste året men väl lite verkligen intresseväckande lack och stilar.
Från början var min tanke att skapa ett mönster som påminner om en stickad tröja med sandlacken. Sen blev det inte riktigt så då min förmåga att skapa raka "pluppar" med dottingtool inte funkade så bra men manikyren är väl ändå helt okay tycker jag!
Studded red holo skittlette
Sunday, 14 December 2014
I really can't wait for Christmas and the opportunity to relax and spend some time off from work!
The coming week is my last before the holidays and since this fall has been extra busy for me I'm glad to see the end of it! Not only has my job gotten quite demanding, I have also taken up German lessons in my spare time and it is proving to be quite demanding. It turns out that learning a new language does not just happen, you have to work on it. Preferably every day!
For me nail art is a good way to relax and take my mind of my "obligations". This manicure was created last week when I probably should've worked on my German. This is my second dotted look for the Nail Challenge Collaborative's December theme. I wanted to create dots without using polish and my newly purchased gold studs were just the accent I was looking for.
A word of warning should be issued on my pictures! They don't justly show the colour of The First Lobster. I found it to lean much more orange than the pictures suggest.
And let's not forget that it's Nail Art Sunday today! Even if there isn't a theme this week I expect to see some holiday looks!
Polishes used: Smitten Polish The First Lobster, Colors by Llarowe The Mighty Red Baron and p2 Precious
PÃ¥ svenska:
Jag kan verkligen inte vänta tills julen kommer med ledighet från jobbet och en chans att bara ta det lugnt!
Den kommande veckan är min sista innan ledigheten och då hösten varit extra stressig så är jag glad att den är över! Inte bara har jobbet blivit lite mer krävande än vanligt, jag har dessutom börjat läsa tyska på fritiden och det visade sig vara rätt krävande. Det visade sig nämligen att man inte bara lär sig språket genom att gå kursen, man måste öva också. Helst varje dag!
För mig är nail art en möjlighet att tänka på annat än mina "måsten". Denna manikyr skapade jag förra veckan när jag troligen borde övat på tyskan istället... Detta är min andra prickiga look för Nail Challenge Collaboratives december tema. Jag ville skapa prickar utan att använda lack och då var ju mina nya guldnitar precis rätt att använda.
Måste också utfärda en liten varning på mina bilder! De visar inte korrekt färgen på The First Lobster. Jag upplevde att den var mycket mer orange än bilderna visar.
Sen får vi inte glömma att det är Nail Art Sunday idag också! Även om det är tema-fritt idag så räknar jag med en del juliga manikyrer!
The coming week is my last before the holidays and since this fall has been extra busy for me I'm glad to see the end of it! Not only has my job gotten quite demanding, I have also taken up German lessons in my spare time and it is proving to be quite demanding. It turns out that learning a new language does not just happen, you have to work on it. Preferably every day!
For me nail art is a good way to relax and take my mind of my "obligations". This manicure was created last week when I probably should've worked on my German. This is my second dotted look for the Nail Challenge Collaborative's December theme. I wanted to create dots without using polish and my newly purchased gold studs were just the accent I was looking for.
A word of warning should be issued on my pictures! They don't justly show the colour of The First Lobster. I found it to lean much more orange than the pictures suggest.
And let's not forget that it's Nail Art Sunday today! Even if there isn't a theme this week I expect to see some holiday looks!
Polishes used: Smitten Polish The First Lobster, Colors by Llarowe The Mighty Red Baron and p2 Precious
PÃ¥ svenska:
Jag kan verkligen inte vänta tills julen kommer med ledighet från jobbet och en chans att bara ta det lugnt!
Den kommande veckan är min sista innan ledigheten och då hösten varit extra stressig så är jag glad att den är över! Inte bara har jobbet blivit lite mer krävande än vanligt, jag har dessutom börjat läsa tyska på fritiden och det visade sig vara rätt krävande. Det visade sig nämligen att man inte bara lär sig språket genom att gå kursen, man måste öva också. Helst varje dag!
För mig är nail art en möjlighet att tänka på annat än mina "måsten". Denna manikyr skapade jag förra veckan när jag troligen borde övat på tyskan istället... Detta är min andra prickiga look för Nail Challenge Collaboratives december tema. Jag ville skapa prickar utan att använda lack och då var ju mina nya guldnitar precis rätt att använda.
Måste också utfärda en liten varning på mina bilder! De visar inte korrekt färgen på The First Lobster. Jag upplevde att den var mycket mer orange än bilderna visar.
Sen får vi inte glömma att det är Nail Art Sunday idag också! Även om det är tema-fritt idag så räknar jag med en del juliga manikyrer!
31 Day Challenge 2014: Day 30, Inspired by a tutorial
Monday, 20 October 2014
Is it weird to be inspired by your own tutorial for the "inspired by a tutorial" prompt of the 31 Day Challenge? I hope it's not, since it is what I did today...
Earlier this year I created a tutorial for my sugary textured stars look. This is created based on that, only not over a bare nail.
Today also marks the beginning of United in Pink, an initiative to raise awareness of breast cancer, which for the second year now is hosted by Lacky Corner. Pink being the campaign colour is the obvious theme colour so you will see lot's of it this week! I will write more on the topic later on this week.
PÃ¥ svenska:
Är det konstigt att inspireras av sin egen tutorial för dagens tema i den stora utmaningen? Jag hoppas att det inte är det, då det var det jag blev idag...
Tidigare i år skapade jag en tutorial för min sandiga/sockriga nail art. Dagens design är skapad utifrån den, enda skillnaden är att den inte är gjord på bar nagel.
Idag är det också start på United in Pink, ett initiativ för att uppmärksamma bröstcancer som för andra året i rad hålls av Lacky Corner. Rosa är kampanjfärgen och alltså det självklara valet hela veckan. Jag kommer återkomma till temat senare i veckan.
Så här såg mina inspirerat av en tutorial-naglar ut förra året.
Idag är det också start på United in Pink, ett initiativ för att uppmärksamma bröstcancer som för andra året i rad hålls av Lacky Corner. Rosa är kampanjfärgen och alltså det självklara valet hela veckan. Jag kommer återkomma till temat senare i veckan.
Så här såg mina inspirerat av en tutorial-naglar ut förra året.
Summer wreath nail art
Sunday, 22 June 2014
Typical Swedish summer weather this weekend. Cold and windy with a touch of rain. I chose not to depict that reality on my nails when the theme for Nail Art Sunday was set to summer.

Instead I depicted a flower wreath like the ones worn for midsummer in Sweden. It looks nice and dreamy to me but I find that a flower wreath is itchy and uncomfortable so was happy to sport a nail version this year.
My base colour is OPI My Vampire is Buff over which I've used a number of greens and a blue, a yellow and a red to create a wreath with a dotting tool. My accent nails are three coats of Catrice Sandhopper, a low grit texture polish with lots of golden undertones. The bee is from a fimo cane.
I did this nail art at the country house with limited supplies at hand. My photos are shot outside and hence I did not do a polish shot this time. As mentioned, OPI My Vampire is Buff and Catrice Sandhopper are the main players for this manicure.
PÃ¥ svenska:
Typiskt svenske sommarväder i helgen. Kallt och blåsigt och med en gnutta regn. Jag valde att inte avbilda den sommaren på mina naglar när temat för Nail Art Sunday blev sommar.
Istället blev det blomsterkransar för mig, ni vet sådana man har i håret till midsommar. Jag tycker kransar är vackra och lite drömska men gillar inte alls att bära dem. Det kliar och är obekvämt så att ha det på naglarna istället kändes som en bra lösning för mig!
Min bas är OPI My Vampire is Buff och jag har gjort kransarna med dotting tool och ett antal gröna samt ett gult, ett blått och ett rött lack. Övriga naglar har tre lager av Catrice Sandhopper, ett grönt finkornigt texturlack med massa guldiga undertoner. Biet kommer från en fimostav.

Instead I depicted a flower wreath like the ones worn for midsummer in Sweden. It looks nice and dreamy to me but I find that a flower wreath is itchy and uncomfortable so was happy to sport a nail version this year.
My base colour is OPI My Vampire is Buff over which I've used a number of greens and a blue, a yellow and a red to create a wreath with a dotting tool. My accent nails are three coats of Catrice Sandhopper, a low grit texture polish with lots of golden undertones. The bee is from a fimo cane.
I did this nail art at the country house with limited supplies at hand. My photos are shot outside and hence I did not do a polish shot this time. As mentioned, OPI My Vampire is Buff and Catrice Sandhopper are the main players for this manicure.
PÃ¥ svenska:
Typiskt svenske sommarväder i helgen. Kallt och blåsigt och med en gnutta regn. Jag valde att inte avbilda den sommaren på mina naglar när temat för Nail Art Sunday blev sommar.
Istället blev det blomsterkransar för mig, ni vet sådana man har i håret till midsommar. Jag tycker kransar är vackra och lite drömska men gillar inte alls att bära dem. Det kliar och är obekvämt så att ha det på naglarna istället kändes som en bra lösning för mig!
Min bas är OPI My Vampire is Buff och jag har gjort kransarna med dotting tool och ett antal gröna samt ett gult, ett blått och ett rött lack. Övriga naglar har tre lager av Catrice Sandhopper, ett grönt finkornigt texturlack med massa guldiga undertoner. Biet kommer från en fimostav.
Labels:
Catrice,
China Glaze,
dots,
embellishments,
KIKO,
Nail Art Sunday,
OPI,
Sally Hansen,
summer,
texture
Textured gradient chevrons
Sunday, 18 May 2014
Suffering from a bit of writer's block, perhaps due to the lure of the gorgeous weather outside so I'll be extra brief today. I'm wearing three different textured polishes over a naked nail which I've taped of with some trusted striping tape. Now to check out Nail Art Sunday!
Polishes used: Essence Me and My Lover, KIKO 640 and p2 Precious
PÃ¥ svenska:
Har lite skrivkramp idag, kanske på grund av det fantastiskt fina vädret som äntligen är här så jag är extra kortfattad nu. Jag bär tre olika texturlack över naken nagel som jag har tejpat med striping tape. Dags att kolla in Nail Art Sunday nu!
Polishes used: Essence Me and My Lover, KIKO 640 and p2 Precious
PÃ¥ svenska:
Har lite skrivkramp idag, kanske på grund av det fantastiskt fina vädret som äntligen är här så jag är extra kortfattad nu. Jag bär tre olika texturlack över naken nagel som jag har tejpat med striping tape. Dags att kolla in Nail Art Sunday nu!
Sandiga stjärnor med beskrivning
Monday, 12 May 2014
English post here. I juli förra året hade jag ett inlägg med gröna stjärnor som jag gillar jättemycket. Jag fick till och med önskemål om en beskriving på hur man gör denna manikyr och nu har jag äntligen fixat en sådan. Färgen är annorlunda men manikyren är densamma!
Först vill jag bara säga att det finns massor av sätt att göra all typ av nail art, processen kan anpassas efter vad man har för verktyg och preferenser, så det är inte nödvändigt att göra exakt som jag! När jag gjorde denna manikyr sist tillexempel, gjorde jag både stegen i delvis annan ordning och hade andra verktyg. Båda metoderna fungerar.
Vad du behöver för vertyg:
Steg 1, måla med ditt lack på påsen. Måla gärna en lite större yta än du tror dig behöva, särskilt om du ska skära ut stjärnorna på fri hand behövs lite utrymme för misstag :). Se till att lacket är täckande genom att exempelvis hålla upp påsen mot fönstret, det är annars lätt att missa otäckande fläckar mot bordet.
Steg 2, vänta tills lacket är helt torrt. Jag väntade i 2 timmar.
Steg 3, använd dig av den spetsiga dotting tool för att lyfta lacket från påsen. Om lacket är helt torrt ska detta vara enkelt. Jag skjuter in verktyget under lackkanten och för försiktigt det fram och tillbaka för att få loss hela biten.
Steg 4, du är nu redo för att börja skapa dina stjärnor (eller annan valfri form!)
Steg 5, jag köpte denna figurstans i Japan (Tokyo hands), den förenklar verkligen denna process. Har letat efter något liknande ett tag då de vanligare stansarna har motiv med diameter på kanske 1cm och uppåt. Det är alldeles för stort för naglar (jag har köpt stansar på både Panduro och Ordning och reda tidigare). Denna stans ger diameter på 4mm respektive 7mm. Perfekt! Om du har en stans så är det bara att stoppa in din lackbit i stansen och se till att motivet helt täcks och stansa på.
Steg 5, alternativ om du inte har en stans. Förra året hade jag ingen stans så då gjorde jag mina stjärnor för hand. Det är lite knepigare men absolut inte omöjligt! Börja med att skära ut små fyrkanter som du kan göra stjärnorna från. Skär därefter ut delar av sidorna tills du har en stjärna. Mina stjärnor blir absolut inte perfekta så här och en del måste slängas men det går att få till hyffsat väl.
Steg 6, när du har alla dina stjärnor redo så målar du din nagel med matt överlack. Jag målade på bar nagel men ett lager nude-färgat under hade inte skadat.
Steg 7, innan överlacket torkat så fäster du dina stjärnor på nageln. Se till att du får den sida av lacket som är sandig uppåt (när man målar på en påse blir undersidan blank/inte sandig). Jag använde mig av fingrarna och samma dotting tool för att fästa stjärnorna.
Steg 8, använd striping tejp för att skapa en linje ovanför stjärnorna. Även om du kan måla rakt utan tejp så hjälper detta till att se till att resultatet blir skarpt och snyggt.
Steg 9, måla toppen av nageln med ditt lack och ta bort tejpen.
Det var hela processen. Jag har inkluderat så många detaljer jag kan så det kan verka som en väldigt omständlig process men det är verkligen inte så farligt!
Några extra bilder på manikyren.
Först vill jag bara säga att det finns massor av sätt att göra all typ av nail art, processen kan anpassas efter vad man har för verktyg och preferenser, så det är inte nödvändigt att göra exakt som jag! När jag gjorde denna manikyr sist tillexempel, gjorde jag både stegen i delvis annan ordning och hade andra verktyg. Båda metoderna fungerar.
Vad du behöver för vertyg:
- Valfritt lack, helst med sand-finish, för att få rätt effekt. Jag använder mig av KIKO 640. Färgen på detta lack är missvisande i själva beskrivningen nedan men på bilden ovan och i slutet är den mer korrekt!
- Ett matt överlack.
- En återförslutningsbar påse eller annan lite halvtjock plast.
- Något att lyfta lacket från påsen med, jag använder en spetsig dotting tool men en tandpetare borde ge samma resultat.
- Något att skapa stjärnorna med, om du har en figurstans gör det processen mycket snabbare men det är inte nödvändigt. Förra gången använde jag en skalpell eller kniv, se exempel nedan.
Steg 2, vänta tills lacket är helt torrt. Jag väntade i 2 timmar.
Steg 3, använd dig av den spetsiga dotting tool för att lyfta lacket från påsen. Om lacket är helt torrt ska detta vara enkelt. Jag skjuter in verktyget under lackkanten och för försiktigt det fram och tillbaka för att få loss hela biten.
Steg 4, du är nu redo för att börja skapa dina stjärnor (eller annan valfri form!)
Steg 5, jag köpte denna figurstans i Japan (Tokyo hands), den förenklar verkligen denna process. Har letat efter något liknande ett tag då de vanligare stansarna har motiv med diameter på kanske 1cm och uppåt. Det är alldeles för stort för naglar (jag har köpt stansar på både Panduro och Ordning och reda tidigare). Denna stans ger diameter på 4mm respektive 7mm. Perfekt! Om du har en stans så är det bara att stoppa in din lackbit i stansen och se till att motivet helt täcks och stansa på.
Steg 5, alternativ om du inte har en stans. Förra året hade jag ingen stans så då gjorde jag mina stjärnor för hand. Det är lite knepigare men absolut inte omöjligt! Börja med att skära ut små fyrkanter som du kan göra stjärnorna från. Skär därefter ut delar av sidorna tills du har en stjärna. Mina stjärnor blir absolut inte perfekta så här och en del måste slängas men det går att få till hyffsat väl.
Steg 6, när du har alla dina stjärnor redo så målar du din nagel med matt överlack. Jag målade på bar nagel men ett lager nude-färgat under hade inte skadat.
Steg 7, innan överlacket torkat så fäster du dina stjärnor på nageln. Se till att du får den sida av lacket som är sandig uppåt (när man målar på en påse blir undersidan blank/inte sandig). Jag använde mig av fingrarna och samma dotting tool för att fästa stjärnorna.
Steg 8, använd striping tejp för att skapa en linje ovanför stjärnorna. Även om du kan måla rakt utan tejp så hjälper detta till att se till att resultatet blir skarpt och snyggt.
Steg 9, måla toppen av nageln med ditt lack och ta bort tejpen.
Det var hela processen. Jag har inkluderat så många detaljer jag kan så det kan verka som en väldigt omständlig process men det är verkligen inte så farligt!
Några extra bilder på manikyren.
Tutorial - sugary texture stars
Way back in July last year I posted this manicure which I'm still more than happy with. I even got some requests to do a tutorial for it and I'm finally delivering it. Different colour but overall same manicure.
I've decided to post the Swedish text in a separate post. Click here for it!
One thing to note first, I find that with all nail there are multiple ways of doing things, the process can be adjusted based on your tools and preferences so there's no need to follow things exactly! In fact, I did this with different tools and in a different order than last time now, both methods work.
What you need to get started:

Step 1, paint your polish onto the zip lock bag. Do paint a slightly larger area than what the stars will actually require. Especially if you're cutting by hand, you're likely to need a little extra for mistakes :). Make sure the polish is opaque by for instance holding the bag against a window to see any bold spots. They can otherwise be easy to miss against the table!
Step 2, wait until the polish is fully dry. I waited for 2 hours.
Step 3, use the pointy dotting tool to lift the polish from the bag. If the polish is dry this should be simple. I slide in the dotting tool and carefully move it sideways to lift it.
Step 4, you're now ready to start creating your stars (or other shape of your choice!)
Step 5, I picked up this crafts punch in Japan (Tokyo hands), it really makes this process as easy as can be. I've been on the lookout for one with such small stars (the more common variety has stars of roughly 1cm diameter) for a while, this one gives you 4mm and 7mm. If you have one at hand then simply put your polish inside making sure the polish covers the cutout. Punch it and you have perfect stars in no time.
Step 5, alternative if you don't have a star punch. Last year I didn't have the punch above so I had to cut the stars by hand. It is trickier, but not at all impossible. I start with cutting out a small square from the polish and remove corners from it until I have an okay star. I'm not able to get them perfect this way and a few might have to be discarded because the polish break into pieces but it works well enough I think.
Step 6, when you have all your stars ready, paint your nail with matte top coat. I painted it on a bare nail but a coat of nude to even out imperfections and discolouration could of course be added before the matte top coat.
Step 7, before the top coat has time to dry, take your stars and add them to the nail. Make sure you get the side of the polish which is textured to face up (the side that sat on the bag will be flat/without texture). I used the same dotting tool and my fingers to get them into place.
Step 8, add striping tape to the tip of your nail. Even if you can paint fairly steady without the help of it, I find that this step helps ensuring that the final manicure has nice and crisp lines.
Step 9, paint the tip with the polish you're using and remove striping tape.
That was the full process. I included as many details as I could so it might sound like a very slow process but it's really not too bad!
Some more pictures of the final look.
I've decided to post the Swedish text in a separate post. Click here for it!
One thing to note first, I find that with all nail there are multiple ways of doing things, the process can be adjusted based on your tools and preferences so there's no need to follow things exactly! In fact, I did this with different tools and in a different order than last time now, both methods work.
What you need to get started:
- Polish of your choice, textured preferably to get the right effect. I'm using KIKO 640. Note that the colour is off in the tutorial but correct in the picture above and at the end of this post!
- Matte top coat
- A zip lock bag or other thickish plastic
- Something to lift the polish from the zip lock bag with, I use a pointy dotting tool but a toothpick should work too
- Something to create the stars with, if you have a craft punch that you can use you're saving lots of time but it's not necessary. Last time I used a scalpel or a knife, see below for some examples.

Step 1, paint your polish onto the zip lock bag. Do paint a slightly larger area than what the stars will actually require. Especially if you're cutting by hand, you're likely to need a little extra for mistakes :). Make sure the polish is opaque by for instance holding the bag against a window to see any bold spots. They can otherwise be easy to miss against the table!
Step 2, wait until the polish is fully dry. I waited for 2 hours.
Step 3, use the pointy dotting tool to lift the polish from the bag. If the polish is dry this should be simple. I slide in the dotting tool and carefully move it sideways to lift it.
Step 4, you're now ready to start creating your stars (or other shape of your choice!)
Step 5, I picked up this crafts punch in Japan (Tokyo hands), it really makes this process as easy as can be. I've been on the lookout for one with such small stars (the more common variety has stars of roughly 1cm diameter) for a while, this one gives you 4mm and 7mm. If you have one at hand then simply put your polish inside making sure the polish covers the cutout. Punch it and you have perfect stars in no time.
Step 5, alternative if you don't have a star punch. Last year I didn't have the punch above so I had to cut the stars by hand. It is trickier, but not at all impossible. I start with cutting out a small square from the polish and remove corners from it until I have an okay star. I'm not able to get them perfect this way and a few might have to be discarded because the polish break into pieces but it works well enough I think.
Step 6, when you have all your stars ready, paint your nail with matte top coat. I painted it on a bare nail but a coat of nude to even out imperfections and discolouration could of course be added before the matte top coat.
Step 7, before the top coat has time to dry, take your stars and add them to the nail. Make sure you get the side of the polish which is textured to face up (the side that sat on the bag will be flat/without texture). I used the same dotting tool and my fingers to get them into place.
Step 8, add striping tape to the tip of your nail. Even if you can paint fairly steady without the help of it, I find that this step helps ensuring that the final manicure has nice and crisp lines.
Step 9, paint the tip with the polish you're using and remove striping tape.
That was the full process. I included as many details as I could so it might sound like a very slow process but it's really not too bad!
Some more pictures of the final look.
Subscribe to:
Posts (Atom)


